Windows 7, 1394 OHCI Compliant Host Controller (Legacy),
the Tascam FW-1884 and Sonar X series (X1 X2 X3).
The "Legacy" firewire setup applies to all DAW software.
Windows 7 Sonar 8.5 and the Tascam FW-1884
Screen shots taken in Sonar 8.5
Getting firewire to work properly
in Win 7 can be
just a bit confusing;
so I've put
together this little tutorial...
DO NOT CONNECT AND POWER ON THE FW-1884 UNTIL DIRECTED TO DO SO!
Step one: setting up the Fire Wire port.
From the Windows Control Panel open "Device Manager"
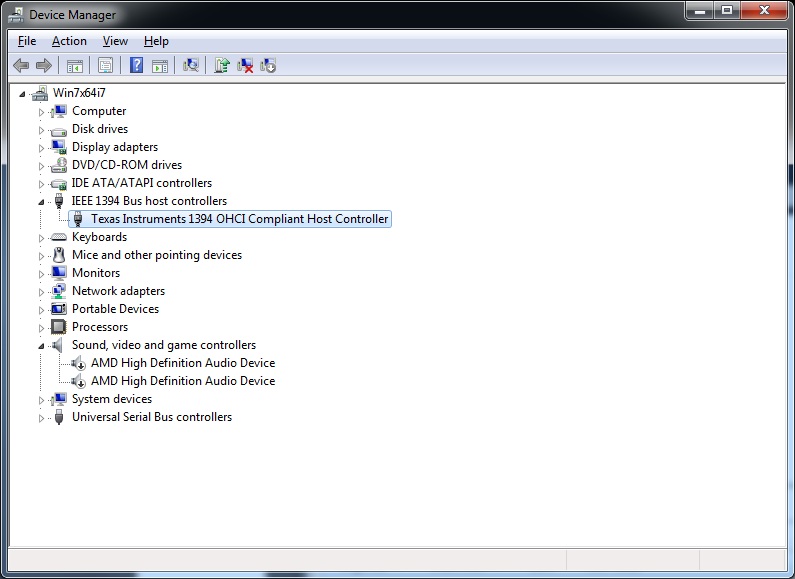
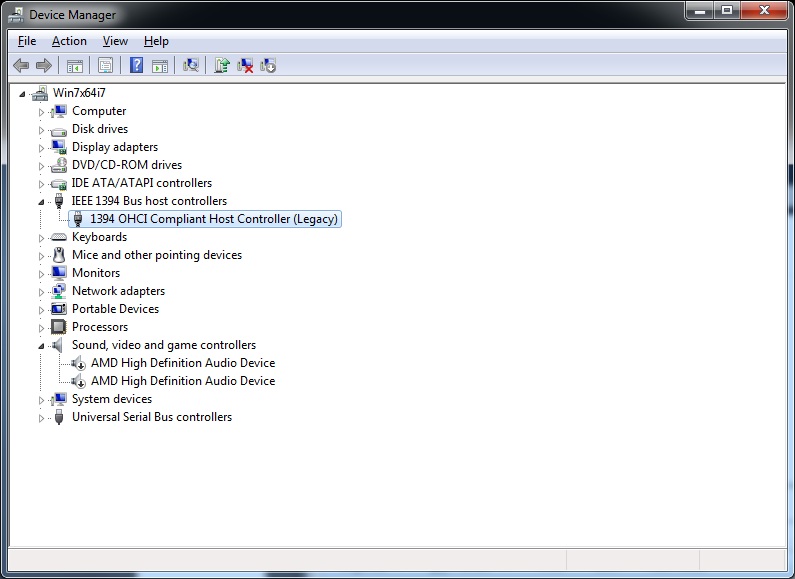
Double click the "IEEE 1394 Bus host controllers", you should
get the screen shot shown below.
Notice that under "IEEE 1394 Bus host controllers" mine is
listed as:
"Texas Instruments 1394 OHCI Compliant Host Controller"
You must have a firewire port that has the TI (Texas
Instruments) chipset!
If your motherboard has a TI compliant chipset you should be good to go!
(Both my Gigabyte H55MUD2H, i3 530 and my new GA-X58A-UD3R, i7 950 do)
If not, install
a PCI or PCIe Texas Instruments controller:
the "ADS Pyro" is one I've used with excellent results,
the Adaptec 4300 is also one that many are using with good success.
Again, your IEEE 1394 must be Texas Instruments OHCI Compliant!

Double click the "Texas Instruments 1394 OHCI Compliant Host Controller", you should get this screen:
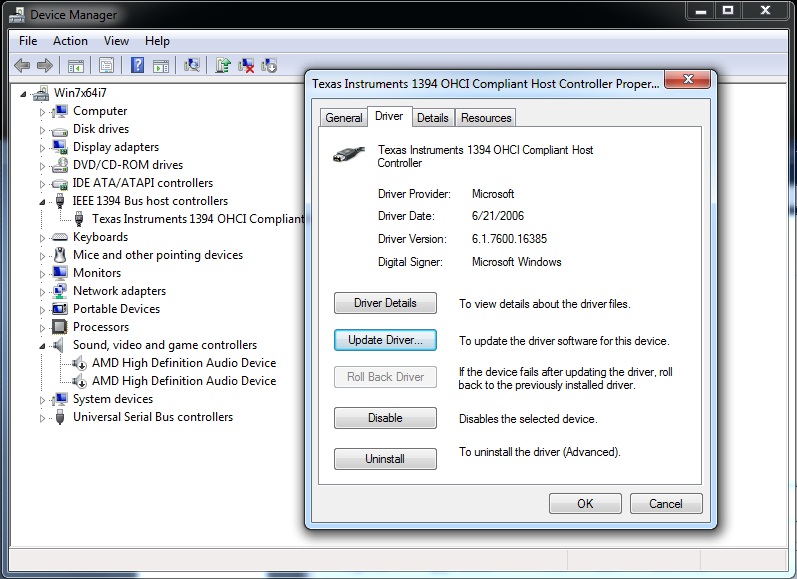
Select "Update Driver...", the screen below will come up...
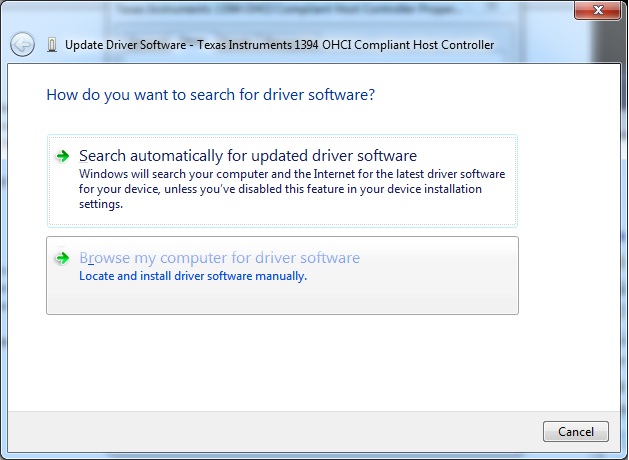
Select "Browse my computer for driver software"
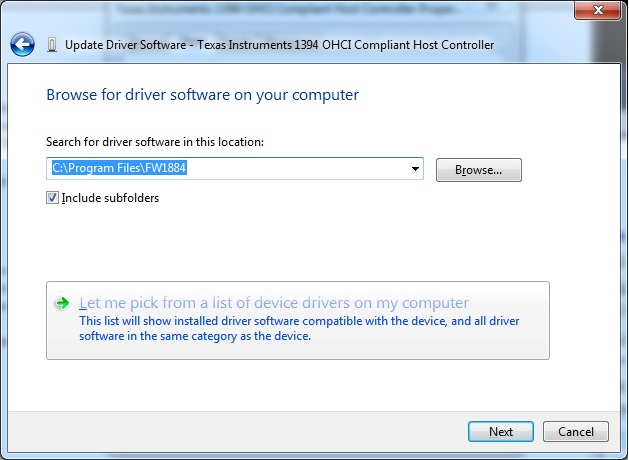
Select "Let me pick from a list of device drivers on my
computer",
We are almost there! I promise...
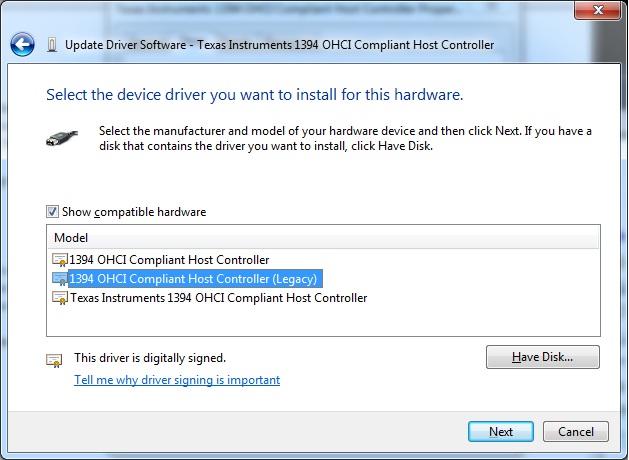
Now select "1394 OHCI Compliant Host Controller (Legacy)" and click Next...
Are you with me so far?
At this point we have rolled back how Windows addresses the firewire port.
Confusing? Evidently MS has "orphaned" firewire once again!
If you'll remember XP SP2 created firewire problems.
Device Manager should now look like this...
Step 2: Install the Tascam driver.
On my Win7x64 install, (StudioCat i7 950 12 gigs of ram), I am using the v1.8 driver.
My Win7x32 (i3 530 with 4 gigs of ram), I'm using the v1.7 driver.

Double click and install the driver.
Step 3: Now connect the Fire Wire cable and Power on the FW-1884.
Windows should report "Found New Hardware", and install the driver
automatically.
Open the FW-1884 Control Panel, its on the left hand side of the unit below "SHORTCUTS".
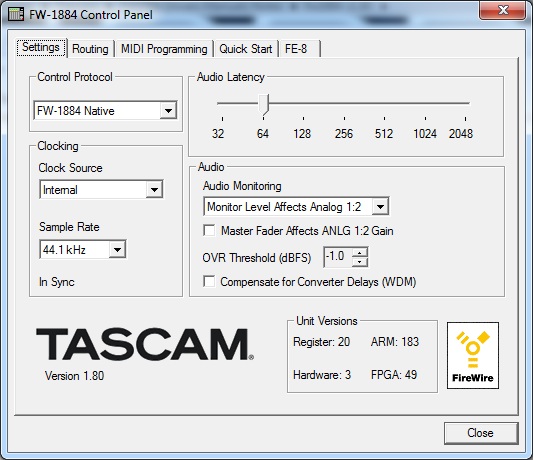
Notice that below the sample rate the FW is reporting that it is "In Sync".
Below "TASCAM" is the driver version, in this case "Version 1.80".
To the right is "Unit Versions" ARM:183 is the "Firmware" version for this unit.
DO NOT UPDATE THE FIRMWARE WITH THE SAME FIRMWARE VERSION!
Evidently this can cause problems, if in DOUBT, seek advice!
Now Click the "Quick Start" tab.
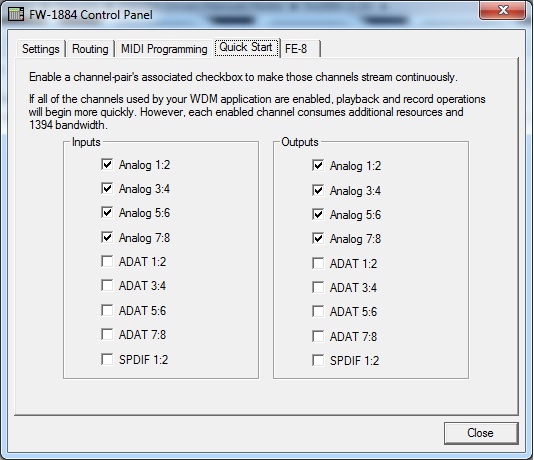
If you have an issue with Sonar kind of stuttering when starting playback,
not the audio,
just the position indicator; enabling the analog In and Outs will solve this.
At this point your Tascam is ready to use with any DAW software, if you are
using Cakewalk's
Sonar X1 continue on...
Now launch Sonar, if this is a new Sonar install, Sonar will automatically
scan for audio
and midi devices.
When Sonar reports "Choose Midi Outputs" select all FW-1884 ins and outs:

Select the FW audio ports you will use:
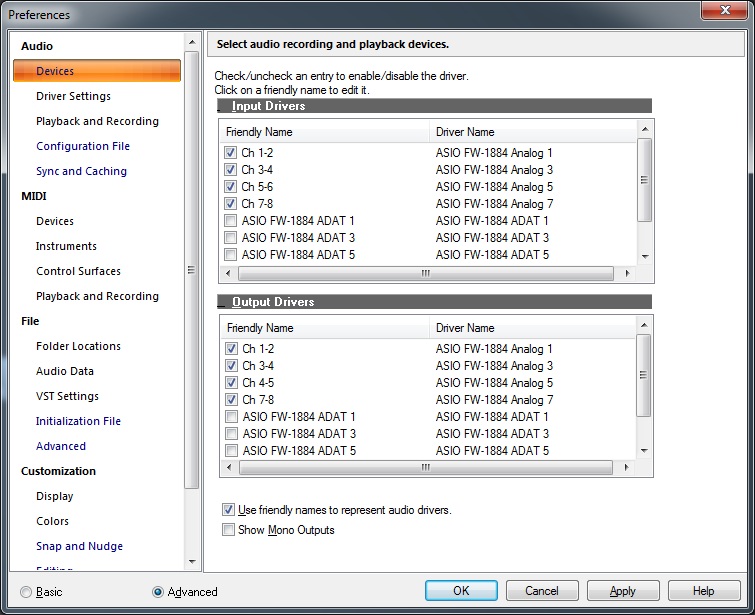
Notice that I have selected "Use friendly names to represent audio drivers".
Now lets move on to "Driver Settings"
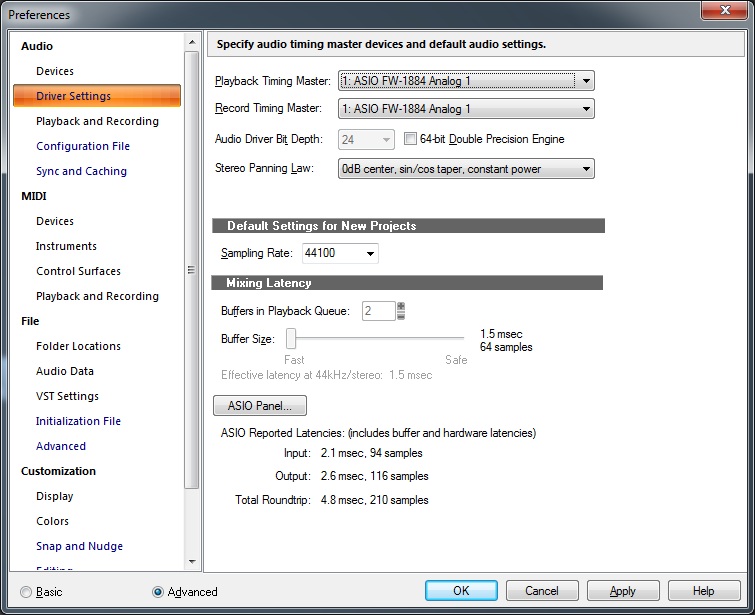
As you can see, I'm getting slightly lower latency in Win 7x64 i7 950 above, than my Win7x32 i3 530 below.

Next on the list; "Playback and Recording", this is a biggie after updating
to X1b!
Look at the check boxes, the one marked "Play Effect Tails After Stopping" must
be checked when
using ASIO drivers. You will get random "buzzing" when stopping a project if
left unchecked.
NOTE: Patching with quickfix 246 seems to have fixed this, I had some other
issues before I
re-booted after applying the fix. Everything appears to be solid now.
My thanks to djjhart for the build 246 tip!

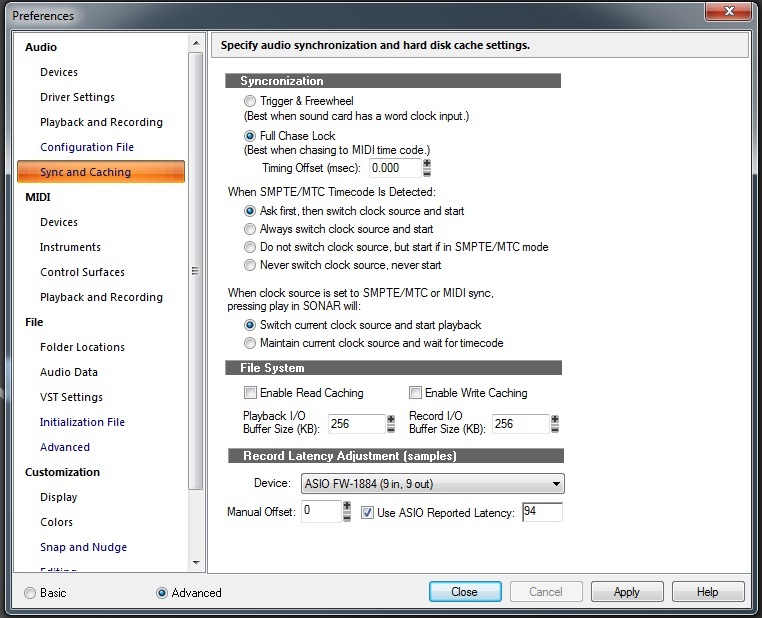
Now lets check "Sync and Caching". Make sure that "Use ASIO Reported Latency"
is checked down
at the bottom of the page. If you are using the WDM drivers you will have to use
the "Manual Offset".
You can review my In Sync
with Sonar tutorial for more details...
Close Sonar and we will install the Sonar Surface Control plugins.
Double click v1.22 and follow the install prompts.
You can find the v1.22 plug-ins here.
If you're going to run Sonar in 32 bit mode install this one:

For Sonar x64 install this one:

You can run Sonar x32 and x64 on your Win7x64 system. Install both plugins if
you choose to run both Sonars.
Now re-open Sonar and we will set up the FW as our control surface.
Open Preferences>MIDI>Control Surfaces:
What's up with clicking the little
yellow star to add a new surface?
Why not have a button that says "ADD"?
Whatever... Click the little yellow star.
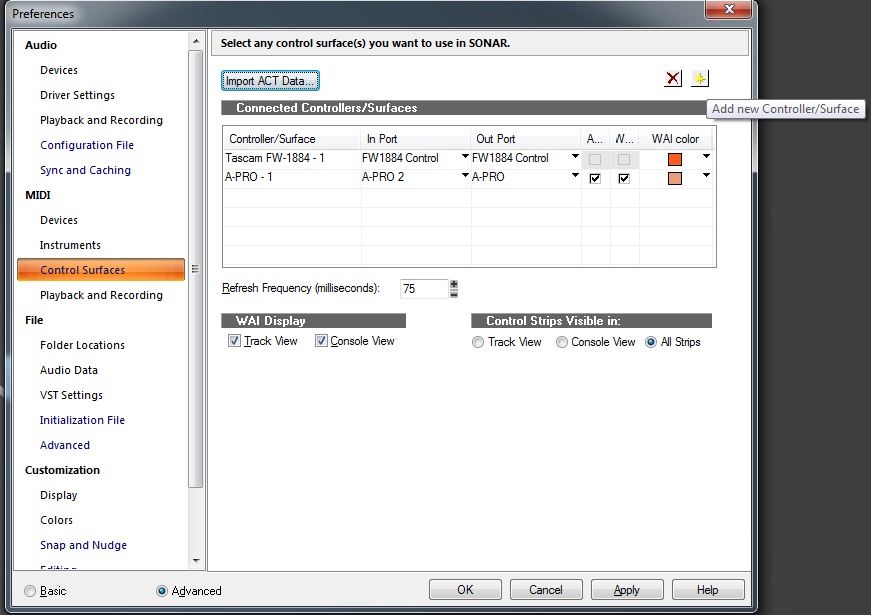
Set the In Port and Out Port to "FW1884 Control" as shown below.
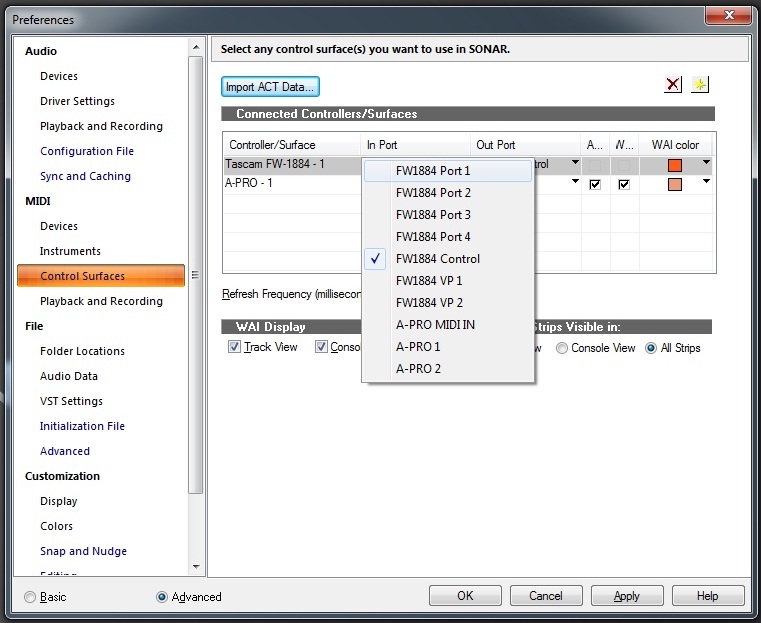
You should now have complete control of Sonar from the FW-1884 control
surface:
A piece of pie, or if you prefer a cakewalk...
Note that selecting "ASIO Panel..." will open the FW-1884 Control Panel.
I had no luck applying "Audio Latency" changes when Sonar is open on my Win7x32
machine.
It works fine on the x64 install, go figure. Maybe the difference in driver v1.7
and v1.8?
Adjusting Latency:
Open the FW "Control Panel", lower, or increase, the buffer size.
Launch Sonar and try. Lather, rinse and repeat until you find your best settings.
I'm running at 64 samples 1.5msec on my i7 950 x64 install.
Best results on the Win7x32 machine are 128 samples, 2.9 msec latency (with the
"Aero" desktop).
At 64
1.5 msec;
I experience some "noise" as I move things around in Sonar.
Disabling "Aero" and using "Classic Windows" allows me to run at
64 samples 1.5 msec latency.
[Just don't tell the 64 bit Campaign boys; they'll beat you up pretty good for such
heresy]
On my x64 system Aero works flawlessly and creates no problems, I still have to
run at 64 samples.
At 32 samples the audio engine in Sonar locks up and will not run.
YMMV..
Hope this helps!